
No, I didn’t just sneeze, it’s oshinko! A simple, no-sweat type of Japanese pickle. If you like a salty, crisp snack in the middle of the day, or something to refresh your palate with at the end of a meal, try making a big batch of these pickles to keep in the fridge. It takes just three days for them to sit at room-temperature, to their slightly fermented state.
You can also use all kinds of vegetables for them, not just the ones I chose here. Common choices might include these, as well as cabbage, lotus root and other types of turnips or radishes. These and other types of Japanese pickles (or tsukemono — and I got nothin’ on that lump of syllables) are usually found at the side of every Japanese meal. Sometimes, they’re colored with food dye because the pickling process can make the colors dull or unsightly, and that is so not Japanese. They’re there because lacto-fermented pickles, like these, help you digest your food. Sadly, many types of pickles aren’t actually fermented, so don’t have these probiotic benefits (such as “cold-packed” ones). Heck, they’re tasty, still.
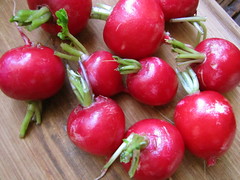 scarlet “sparkler radishes
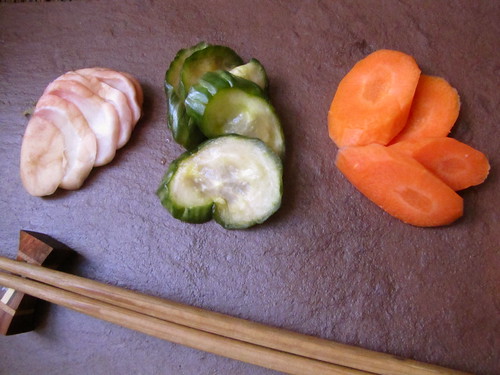
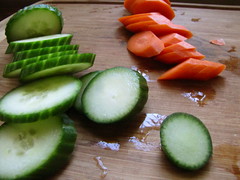 English cucumber and carrot slices
I became obsessed with pickling toward the end of summer, putting up everything from the garden, or just stuff I had too much of leftover. I’ve tried my hand at Japanese pickle-making, too, with an ill-fated attempt at making nukazuke, which is fermented while buried underneath rice bran, and “kimchi” that was not. But, these failures didn’t deter me from trying out other types of tsukemono.
Oshinko is similar to sauerkraut, because there usually isn’t any other seasonings involved in the pickling process but salt. They have a supple, somewhat rubbery texture that crunches satisfyingly after just a moment of pressing down with your teeth. There’s a go-to Japanese restaurant in the East Village that my boyfriend goes to for his Japanese food fixes. They have a fantastic tray of chilled oshinko as one of the starters. There, the vegetables are sliced thicker than at most, and the radishes are sliced through the bulb, but kept dangling from the stem. I dare say I copied these techniques from the place, but had to figure out exactly how to make them myself.
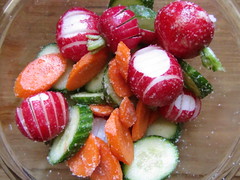 tossed with plenty of Kosher salt
Once I heaped a small bowl with these vegetables, all sliced up, I gave them a hearty downpour of Kosher salt. It’s important to use non-iodized salt in any pickles (as the iodine will make the brine cloudy). Then, for a little more flavor, I sprinkled in just a tablespoon each of rice vinegar and salt, and tossed. The next part is where the creativity actually comes in: the vegetables need to be weighted down with something heavy as they sit.
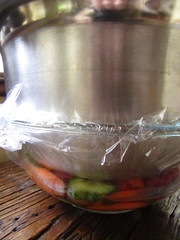
A few bowl and plate swaps later, I found a wide, shallow glass bowl to put the vegetables in, and a metal bowl with a base that neatly fit inside. Over the vegetables I spread a sheet of plastic wrap, and placed the metal bowl on top. Inside that, I placed the heaviest thing I could find in the cupboard: a rustic stone mortar and pestle. (I didn’t even know it was in there, or else I would have used it to crush spice a few times!) This seemed to press down the vegetables sufficiently, without crushing them.
Over the next few hours, you’ll see the liquid well up at the bottom. Drain as often as you see them become submerged; I think the total number of times I drained the liquid over the next three days was around five. Be sure not to use a vessel that’s porous or reactive for the vegetables, too. Forget about Tupperware, as convenient as this may seem, as they may lend your pickles a plasticky taste. I learned this the hard way after some homemade yogurt from way back — God, that was awful!
So if your pickles don’t come out quite right the first time, take it from one who has failed a lot: try, try again. The most common mistake might be not using enough salt, which can allow harmful bacteria to thrive. It may seem like a drastic amount of salt when following the recipe below, but remember, it’s not there just for taste; the salt will draw out moisture from the vegetables to help them ferment.
Also, if your failure is due to a lack of something weighty to press the pickles down — who would have guessed it? — the Japanese actually have a tool for that. It’s a pickle press, to make salt pickles like these. Check it out.
Carrot, Cucumber and Radish Oshinko
(makes about 1 quart)
half a bunch radishes (about 1/3 lb)
1/3 lb carrot, peeled and sliced to 1/4″ oval discs
1/3 lb seedless, hothouse or English cucumber, sliced to 1/4″ oval discs
2 tablespoons Kosher salt
1 tablespoon rice vinegar
1 tablespoon sake (optional)
Trim roots and stems to 1/2″ from the radishes. Holding each one upside-down by the stub, cut 1/4″ slices into the bulbs while keeping the slices all attached. (This is to let the brine seep into the radish while keeping them big, chunky pieces. If you don’t care about having big, chunky pieces, then just trim and slice the radishes like the other vegetables.)
Place vegetables in a wide, shallow, glass (or another non-reactive, non-porous) bowl. Cover with plastic wrap. Place a plate or bowl that fits snugly on top of the vegetables on top. Place something heavy on top of this, so that the vegetables are well-pressed.
Set aside in a cool, dry place. Over the next few hours, drain the liquids that well up at the bottom of the bowl. Over the next three days, do this as often as you find necessary. Pickles are ready to eat after three days. Keep them in an airtight container in the refrigerator afterward.
Cost Calculator
(for about 6 small servings)
1/2 bunch radishes: $1.50
1/2 carrot: $0.50
1/2 English cucumber: $1.50
2 tablespoons Kosher salt: $0.15
1 tablespoon rice vinegar: $0.20
1 tablespoon sake: $0.40
Total: $3.75
Health Factor![]()
![]()
![]()
![]()
![]()
Five brownie points: This is a health-driven snack, but remember to enjoy it in moderation as it has tons of sodium (it’s so salty you probably won’t want to gobble up huge portions of it anyway). Pickling isn’t just about preserving vegetables; when they ferment, the chemical properties totally alter, creating benefits that weren’t there in the first place. Which is better for you? Between eating, say, a fresh carrot and one that’s been lacto-fermented? Well, they’re just different, with different benefits each. So best to mix up your intake.
Green Factor
Four maple leaves: This is pretty low, for a recipe that’s essentially just vegetables — themselves a low carbon footprint food, comparably. But it’s because none of the three vegetables used this time were found locally, as they could have been earlier in the year. However, it does serve as a good way to be reminded that the next time they are, to make these and have them stored all year ’round.
11 Responses
matt
I’m excited to try this. I love all pickles.
CrossFitNYC.com – Yesterday was just practice for today
[…] DAY 23 of the BLACK BOX 30-DAY PALEO CHALLENGE–LINKS: Skillet butternut squash and greens Carrot, cucumber and radish oshinko […]
Sunday Evening Post(s) « pease porridge pdx
[…] to make quick japanese pickles for plumping up your bento or for […]
Kruzon
Oshinko, we’ll be trying these piclkles in a couple of days. Thanx
Madeline
Thanks for sharing. I love Japanese pickles, and didn’t realized it was so easy to make.
Fiona
Hi, I just finished reading your book and thoroughly enjoyed it, so thought I’d look you up online. I’m loving your blog, it’s the best I’ve seen so far.
I’m excited about trying pickles too. I am wondering if they would work with something like the rind of watermelon? I saw them used as pickles (but cooked somehow) on a cooking show. I have boiled them in a sugar syrup with lemon and it’s actually really nice. I’m going to try and see if you can pickle melon rind this way 🙂 Thanks 🙂
jleonardelli
Thanks for the recipe
I bought a pickle press and the instructions were in japanese
I see you recipe and they came out great
Joel Matsuzaki
I suggest adding dried Konbu, a japanese seaweed, to add more depth to the flavor. It’s very good!
jimo piot
i just bought a japanese pickle press ( about 20$ and free postage from Jp) i will be trying this recipe first of all.